Access CareConnect Provider mobile app (iOS and Android) or CareConnect Provider Web.
This guide provides a comprehensive walkthrough of the enrollment process for families connected to external providers within CareConnect. Follow these step-by-step instructions to efficiently manage the enrollment of new students and families.
Enrolling a Family
To initiate the enrollment process for families with external providers, follow these steps:
Step 1: Access Provider Enrollment
- In your CareConnect environment, navigate to the Students module.
- On the left sidebar, locate and click the Provider Enrollment section to access the Provider Enrollment student list.
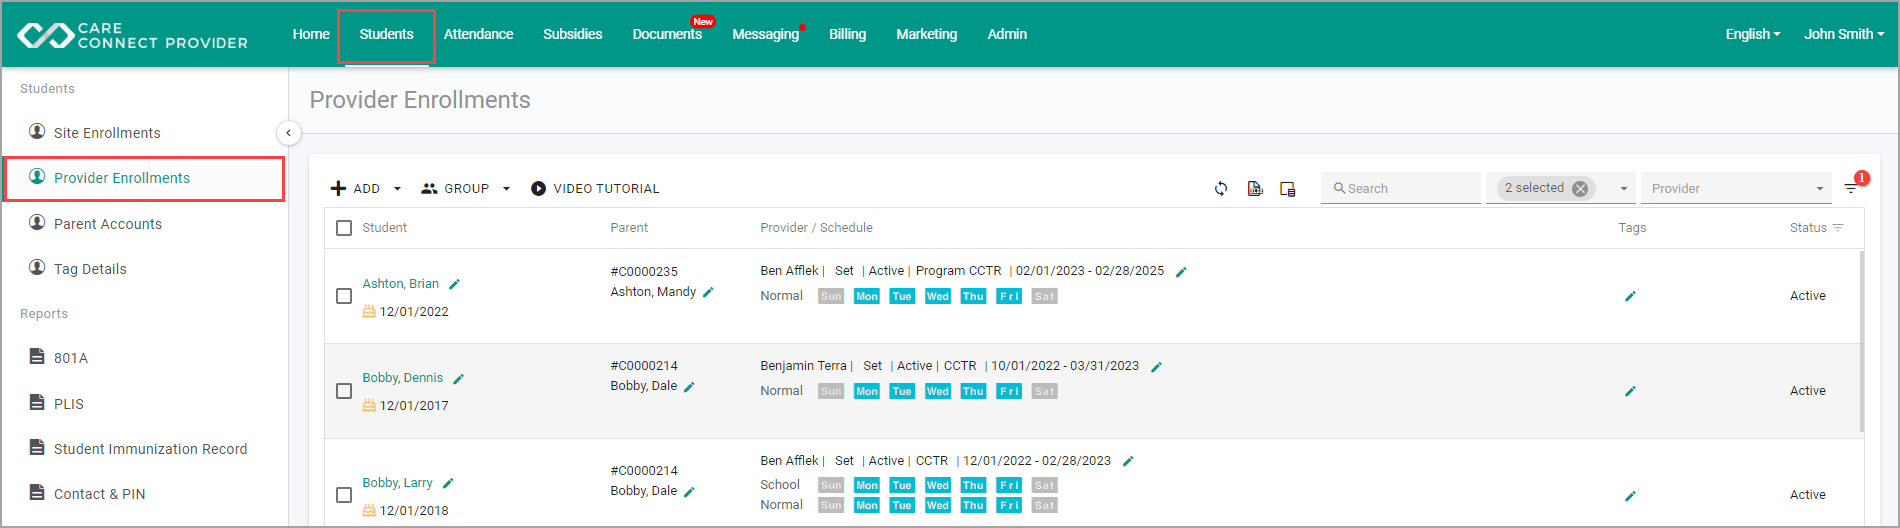
Step 2: Initiate Enrollment
Within the Provider Enrollment section, find the +Add button. Clicking this button presents you with two enrollment options:
- Enroll Family: Use this option to enter comprehensive information for students and families. This process spans three steps: adding a student, adding a parent, and adding another contact.
- Quick Add Student: This option is designed for swift enrollment of individual students with minimal information.
Choose the Enroll Family option to proceed with a thorough enrollment process.
Step 3: Add Students / Schedule
- Click Add Student to begin entering details for a new student. Complete the necessary fields including:
- Name: Student's full name
- Date of Birth: Student'sdate of birth
- Race: Student's Race
- Ethnicity: Student's Ethnicity
- Current Site:
- Decide whether to add the student's schedule. If needed, provide schedule details such as:
- Program: Enrolled program
- Period start and end date: Enrollment start and end date
- Provider: Assigned provider for the Care Schedule
- Click Save to confirm the student's schedule.
- Proceed to Step 2 or repeat Step 1 by clicking the Add Student button to add other siblings on the 3-step summary page.
Step 4: Add Parents / Guardians
Click Add Parents/Guardians to add a new parent to the family. Provide relevant information, including:
- Name: Parent's full name
- Responsibility: Parent's role (Parent A, Parent B, Other)
- Relationship: Parent's relation to the student
Proceed to Step 3 or repeat Step 4 by clicking the Add Parents/Guardians button to add a second parent/guardian.
Step 5: Add Other Contacts
Click Add Other Contacts to include additional emergency contacts for the family. Enter contact details similar to Parents/Guardians.
Repeat Step 5 if more emergency contacts need to be added.
Step 6: Complete Enrollment
- Once all three steps are completed, click Save to finalize the family's enrollment.
- Note: After clicking Save, if you've entered a parent's cell phone or email, you will be asked if you'd like to send the parent an invitation. To learn more about this process, click here.
- You will be redirected to the newly added student/family page.
By following these steps, you ensure accurate and efficient enrollment of families with external providers in CareConnect. This process enhances the overall management and communication for these families.
Final Note: Provider Enrollment vs. Site Enrollment
FCCHEN programs should use Provider Enrollment to enroll and manage children with external providers.
You may also see Site Enrollment directly above Provider Enrollment in the navigation menu. This is expected. CareConnect supports agencies that use Site Enrollment, Provider Enrollment, or both, so both options may be visible even if your agency only uses Provider Enrollment.
If Site Enrollment Is Used by Mistake
If a family is accidentally added through Site Enrollment, the enrollment can still be used.
For children enrolled with an external provider, make sure a Provider Schedule is added. A Provider Schedule is required before payments can be generated.
If you are viewing Site Enrollment and need to find a Provider Enrollment, use the Site filter and select Unassigned. Provider Enrollments are not connected to a site, so they will appear under Unassigned.
For FCCHEN programs, always use Provider Enrollment as your primary area for adding and managing enrollments.
Comments
0 comments
Article is closed for comments.